A Pipe Dream
The city of Chicago required the use of lead service lines (the pipes that connect the water mains to home plumbing) in private homes until they were banned nationwide by the Safe Drinking Water Act in 1986. As a result, nearly 80% of the city’s properties have their water delivered through lead pipes. This potentially contaminated water, along with lead exposure from air, paint, and soil, resulted in the poisoning of nearly a generation of Chicago’s kids, with more than half testing positive for high lead levels in the 1990s.
In this post I’ll talk about the ongoing reality of lead in Chicago’s water supply, how the city is failing to address the problem, and a potential solution in the form of a $60 gadget that anyone can build and install in their home.
- More background
- How bad is lead?
- Official recommendations
- The pipe dream
- Assembly and installation
- Next steps
More background
The number of children testing positive for high lead levels has (mercifully) declined over the past two decades (primarily due to a 1978 regulation banning the use of lead paint, and subsequent efforts to remediate existing properties), but it’s still above 20% in many poor and predominantly African-American neighborhoods. Despite increased attention from the Flint water crisis (and unlike neighboring cities such as Milwaukee), Chicago is not replacing lead service lines as part of its ongoing effort to modernize water mains throughout the city. Instead, the Department of Water Management has opted to continue the existing anti-corrosion policy of adding blended phosphate to maintain a protective coating in service lines.
However, a recent study by Flint whistleblower Miguel Del Toral showed that when lead service lines are disturbed (e.g., during a water main replacement), the lead phosphate coating can become dislodged. This has the doubly bad effect of drastically increased lead concentration immediately following the disturbance, and reduced protection from lead leaching over a period of years while the coating rebuilds.
Although Chicago is technically in compliance with current EPA regulations (derived from the 1991 Lead and Copper Rule), Del Toral’s research showed that the mandated testing protocol (50 non-random[!?] residential water tests over three years) is woefully inadequate for detecting the rapidly fluctuating lead levels caused by service line disturbances. This is not to mention the fact that 15 ppb is an arbitrary standard, and “there is no known safe level of lead in a child’s blood.”
How bad is lead?
But is it really such a big deal to have a few micrograms of lead in our drinking water? The scientific consensus is a resounding “yes,” and even trace amounts of lead can have negative health effects such as:
- Irritability
- Vomiting
- Hearing loss
- Seizures
- High blood pressure
- Joint and muscle pain
- Difficulties with memory or concentration
- Mood disorders
- Miscarriage, stillbirth or premature birth in pregnant women
Lead poisoning in children is especially pernicious, because it can lead to developmental delays and learning disabilities, which have a multiplicative effect on future potential. Studies have also shown a disturbing relationship between lead poisoning and violence, summed up in what might be the scariest graph I’ve ever seen (even if correlation doesn’t imply causation):
For an excellent (if slightly circuitous) introduction to the history of lead poisoning, I recommend watching the Cosmos episode “The Clean Room” (currently available on Netflix).
Official recommendations
It’s important to note that there are official recommendations you should follow before building anything. First, it’s a good idea to verify that your service line is actually lead. This can be tricky, depending on whether you own or rent, or even have access to the basement, but thankfully NPR has put together a helpful guide to walk you through the process.
Assuming your line is lead, the next thing to consider is getting a water filter. Most filters rated for lead are the expensive, under-the-sink variety, but a company called ZeroWater sells a Brita-like device that costs as little as $20. Unfortunately, what you save on the pitcher you later spend on the replacement filters: a quick calculation using ZeroWater’s replacement guide, and the average TDS of Chicago water, shows that a typical filter might last as little as 10 days, leading to recurring costs of over $350 per year per household.
It’s also worth considering DWM’s free water testing kit offer, though as Del Toral’s paper showed, the test may not be sensitive to the unique characteristics of Chicago’s water infrastructure.
But by far the most common recommendation, both from DWM and the EPA, is to flush your taps for about five minutes if your water has been stagnant for more than six hours. The idea is simple enough: running your tap for five minutes should clear all the potentially contaminated water from the service line through your pipes, regardless of the status of the protective coating.
The pipe dream
As easy as it sounds, I’m not thrilled by the prospect of incorporating a mandatory five minute tap flush into my daily schedule. Human beings have a notoriously difficult time learning tasks with no clear feedback mechanism, and it’s that much worse when the consequence of failure is ingesting a known neurotoxin. And that’s not even accounting for the fact that poorly automated systems really annoy robotics engineers…
On the suspicion that others might also be unaware of the scope of Chicago’s lead problem, and doubtful of their ability to consistently follow the official recommendation, I designed a simple, inexpensive device to automate the tap flushing process: pipe dream.
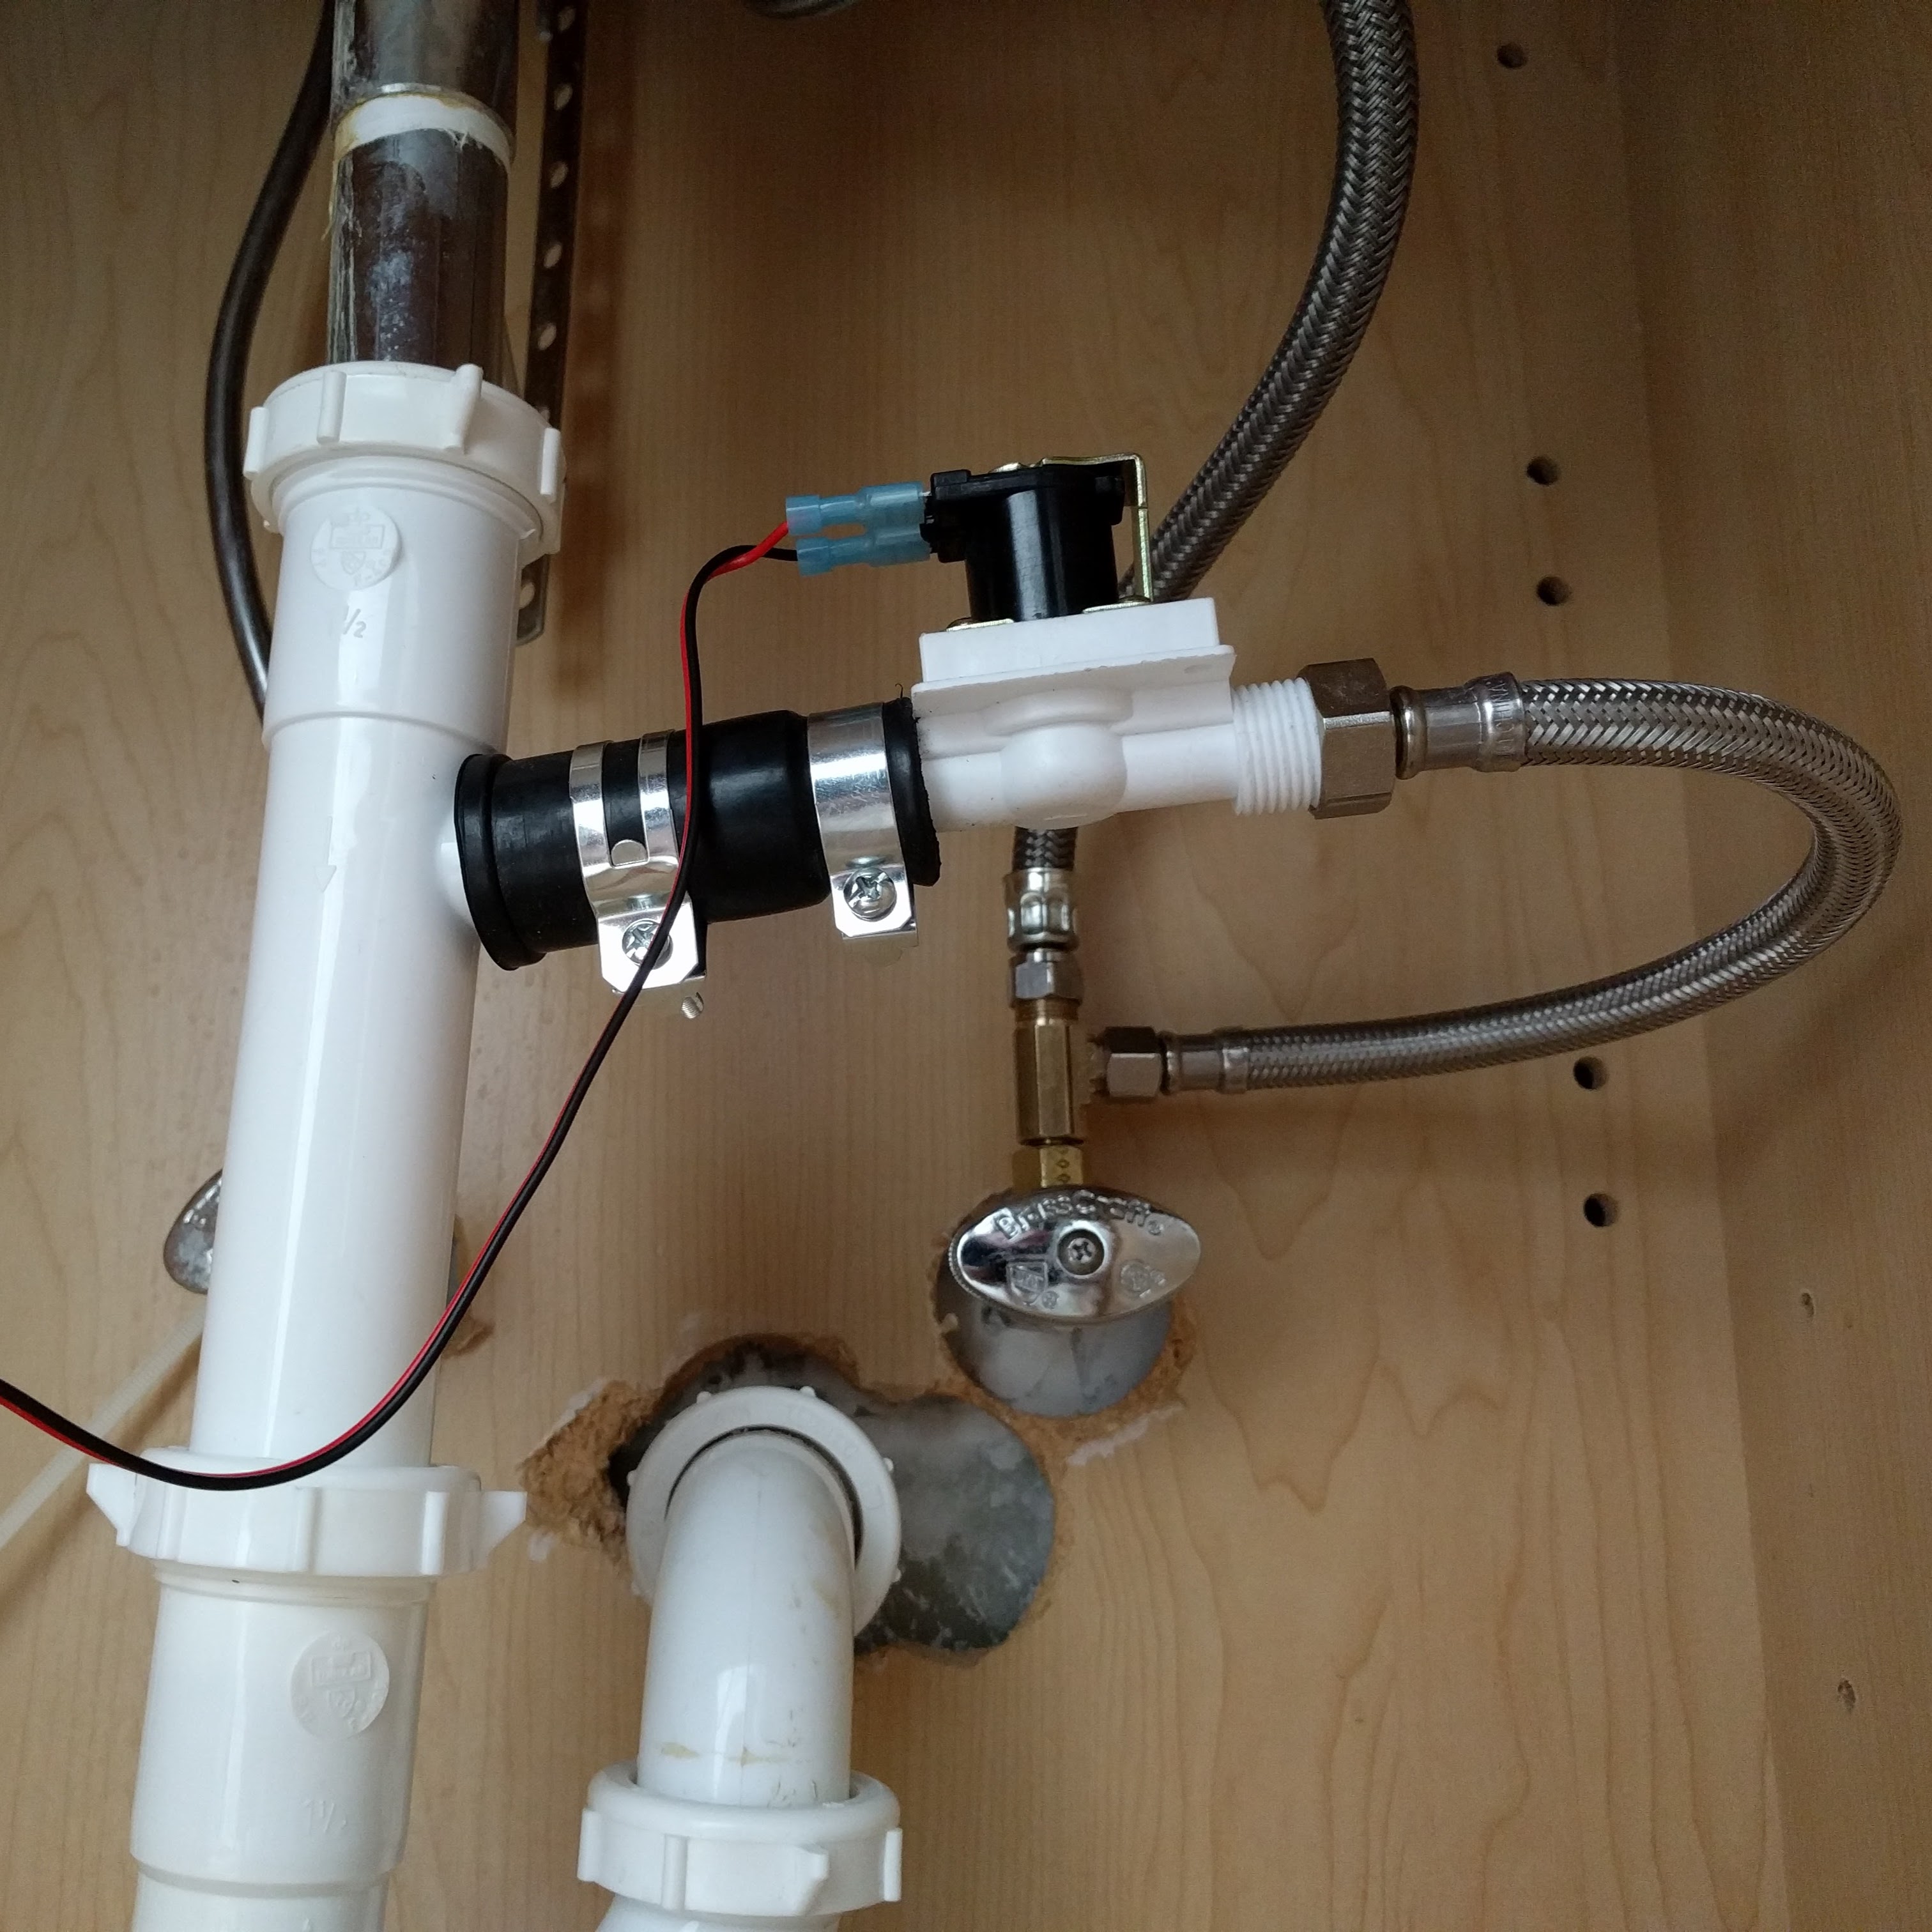
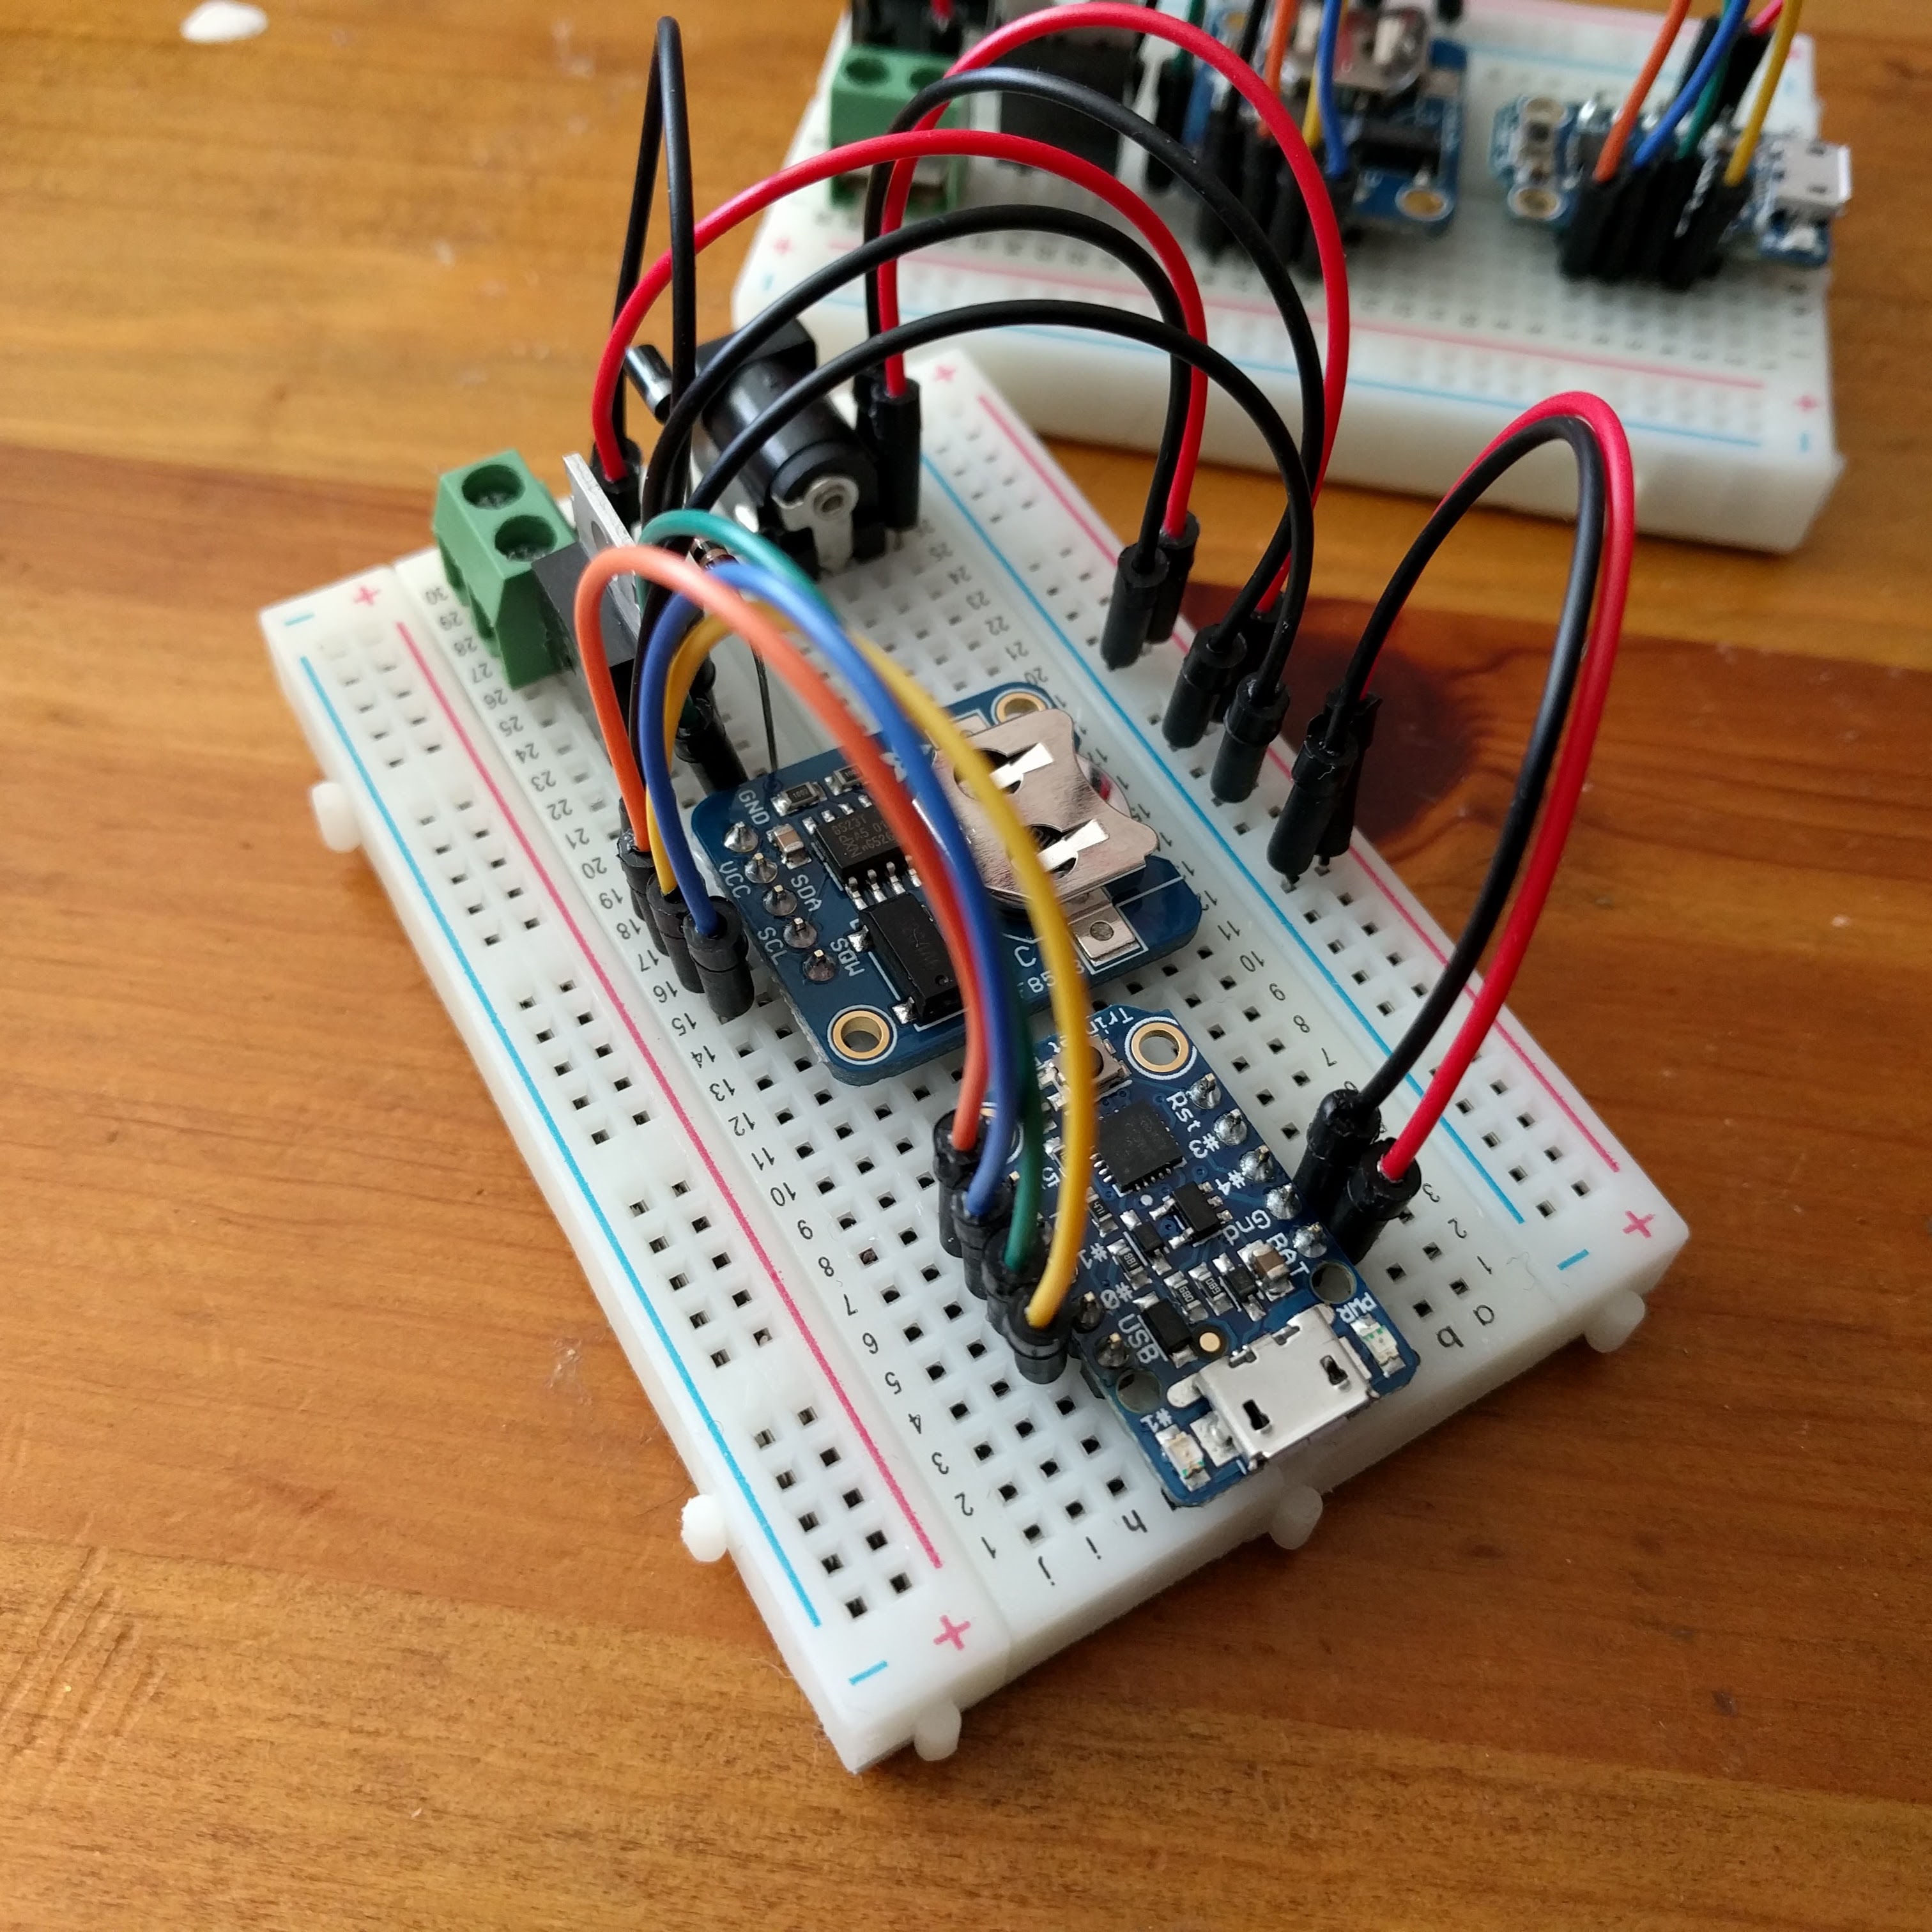
Pipe dream, as you can see above, is just a solenoid valve that sits under your sink, between the water supply and drain. The valve is controlled by a simple Arduino-based circuit, which automatically flushes the tap every day at a set time, for a specified duration. The prototype board is shown below:
Assembly and installation
Here’s how to make your pipe dream a reality. First you’ll need the following electronics supplies (per-unit price derived from Adafruit’s website):
| Electronic Parts | Price |
|---|---|
| 12 VDC 1000mA regulated switching power adapter | $8.95 |
| Plastic Water Solenoid Valve - 12V - 1/2” Nominal | $6.95 |
| Adafruit Trinket - Mini Microcontroller - 5V | $6.95 |
| Adafruit PCF8523 Real Time Clock | $4.95 |
| Half-size breadboard | $5.00 |
| Breadboarding wire bundle | $1.50 |
| 2.1mm DC barrel jack | $0.95 |
| CR1220 12mm Diameter - 3V Lithium Coin Cell Battery | $0.95 |
| TIP120 Power Darlington Transistor | $0.83 |
| Solid-Core Wire Spool - 25ft - 22AWG | $0.59 |
| Terminal Block | $0.59 |
| 1N4001 Diode | $0.15 |
| 2.2K ohm Through Hole Resistor | $0.03 |
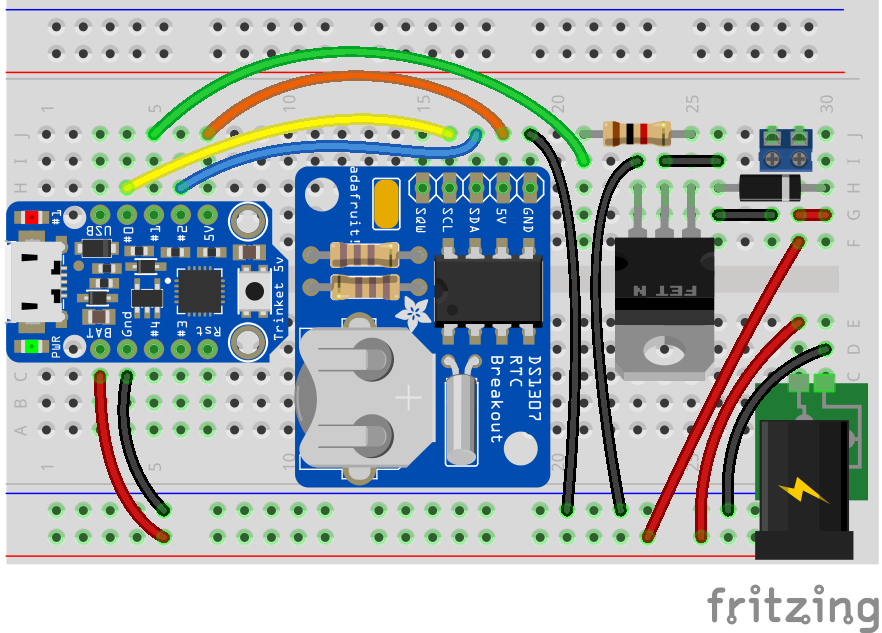
Assemble everything on the breadboard as shown in the fritzing below, and install the battery in the RTC (note that the RTC is a different model, but the pinout is the same):
To load the software, install the Arduino IDE, and follow Adafruit’s instructions to add support for the Trinket. Then download the sketch and adjust the following lines for the desired flush time and duration:
    // set flush time (0, hours, minutes, seconds) after midnight
    ft = TimeSpan(0, 6, 0, 0);

    // set flush duration (seconds)
    fd = TimeSpan(300);
Finally, set the board for Adafruit Trinket 16MHz in the Tools menu, and click Upload! Note that the sketch will sync the RTC with your computer’s date and time, so make sure everything is current before proceeding.
The mechanical parts are all common plumbing supplies, and should be easy to find at a local hardware store (prices below from Home Depot):
| Mechanical Parts | Price |
|---|---|
| 3/8 in. Compression Brass T-Fitting | $5.98 |
| 3/8 in. Compression x 1/2 in. FIP x 12 in. Faucet Connector | $5.54 |
| Rubber Dishwasher Branch Connector | $3.31 |
| Plastic Dishwasher Wye Tailpiece | $3.27 |
Assemble the components as shown in the above image, and install under the sink closest to your service line (be sure to shut off your water supply valve first!). Note that in order to attach the valve to the rubber branch connector, I first had to cut off the section with the smallest diameter: I haven’t tested how well this connection holds in the event of a clogged drain, so proceed with caution! Finally, wire the valve to the terminal block, and you’re done!
In total, one prototype pipe dream costs about $60, and should last for several years; long enough for the protective coating to rebuild after a water main replacement.
Next steps
So far I’ve built a handful of prototype units, and recruited a few friends around Chicago for an initial trial run. I’m also planning to use the opportunity to get user feedback and generate a more comprehensive assembly and installation guide.
Beyond that, I’m thinking ahead to v2, and hoping to get the price down to the $20 range with custom circuit boards and bulk pricing. If you have any pipe dream interest in the meantime, feel free to send me an email.


