Well Siting Meter
About a year ago, JustDesign was contracted by Global Hope Network International (GHNI) to build an inexpensive, open-source well siting meter for water borehole drilling. GHNI’s West Africa team had recently received new drilling equipment, but had hit rock on both of their initial attempts, and needed a way to determine the best spot for future digging. Commercial well siting meters were not an option due to high costs, which can range from $3,000 to $10,000 per device.
Fortunately, a set of 2016 papers by James Clark et al. described several inexpensive devices for discovering underground water, including GHNI’s preferred option, a resistivity meter. JustDesign’s task was to recreate, and if possible, improve upon the designs proposed by Clark. This post describes the process that resulted in the latest version of our meter, as well as instructions for building your own.
Background
Number 6 of the United Nations Sustainable Development Goals states the following:
Water scarcity affects more than 40 percent of people around the world, an alarming figure that is projected to increase with the rise of global temperatures as a result of climate change. Although 2.1 billion people have gained access to improved water sanitation since 1990, dwindling supplies of safe drinking water is a major problem impacting every continent.
Safe drinking water is in especially short supply in sub-Saharan Africa, where more than eight in 10 don’t have a piped source, forcing individuals (typically women) spend hours each week collecting water. This is true even in communities with untapped groundwater potential, which could be used to increase the supply available for consumption, sanitation, and irrigation.
Given the proper equipment, wells can be drilled with high accuracy, but locating groundwater without a siting meter is a notoriously difficult process (the field even has its own popular pseudoscience). Actual siting methods, using resistivity and seismic technology, can be combined an understanding of local geology to produce detailed subsurface maps.
Resistivity meters
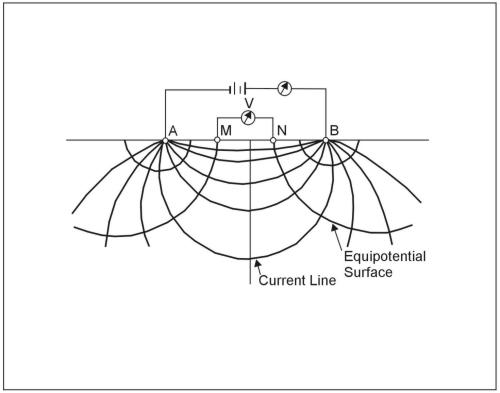
Resistivity meters are a popular option for well siting applications. They work by creating a high voltage potential to the ground surface, and using probes to measure the induced current and voltage, from which the resistivity can be calculated. Abrupt changes in resistivity are often indicative of the boundaries between underground layers, and potentially the presence of groundwater.
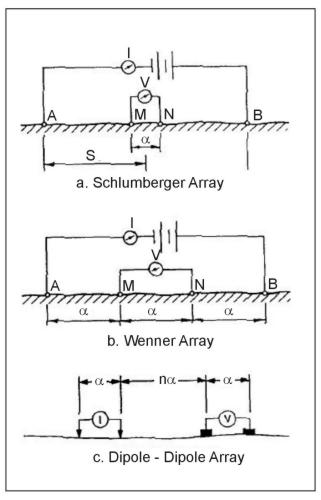
In order to gather data that can be used to understand the subsurface geology, the probes must be placed in one of several geometric arrangements, each with its own characteristic equation for converting voltage and current measurements to resistivity:
The traditional Wenner Array, recommended for well siting beginners because its simplicity, uses equal probe spacing \(\alpha\), and a corresponding resistivity equation of:
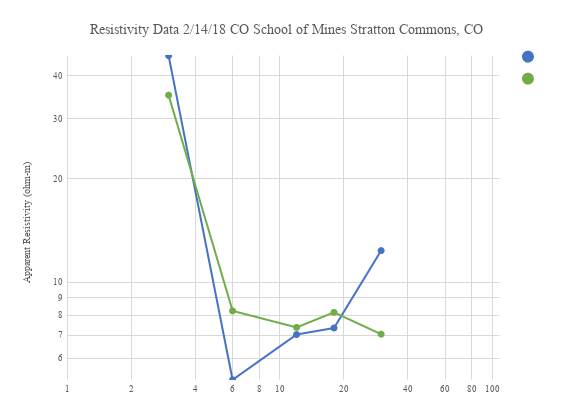
\[\rho=2 \pi \alpha \frac {V}{I}\]Producing a map of the underground resistivity at various depths (\(d=\frac {3\alpha}{2}\)) is as easy as taking sequential measurements, centered around the point of interest, with increasing \(\alpha\), and plotting the results (typically on a log scale), as shown below:
Version 1
Our first task was to replicate the resistivity meter design proposed by Clark in his paper “Appropriate geophysics technology.” The device, which was designed to cost less than $250, uses several commercial off-the-shelf (COTS) components and a custom switch box, as shown in the schematic below:
Although the paper includes a detailed description of the design, it does not supply a bill of materials (BOM), and so generating one at the $250 price point was the first task. The BOM for the Version 1 (v1) meter is shown below:
| Part | Pkg Qty | Pkg Price | WSM Qty | WSM Price | Supplier |
|---|---|---|---|---|---|
| 400W / 800W Power Inverter | 1 | $24.99 | 1 | $24.99 | Harbor Freight |
| 7 Function Digital Multimeter | 1 | $5.99 | 2 | $11.98 | Harbor Freight |
| Auto Battery Float Charger | 1 | $8.99 | 1 | $8.99 | Harbor Freight |
| 330’ x 1/2” Open Measuring Tape | 1 | $16.99 | 2 | $33.98 | Harbor Freight |
| 28 Pc Electrical Clip Set | 1 | $2.99 | 1 | $2.99 | Harbor Freight |
| 4mm Banana Connector Binding Post | 30 | $16.18 | 8 | $4.31 | Amazon |
| AC Power Socket | 4 | $8.73 | 1 | $2.18 | Amazon |
| Hammond Enclosure | 1 | $7.42 | 1 | $7.42 | Amazon |
| Bridge Rectifier | 5 | $17.30 | 1 | $3.46 | Amazon |
| 120uF Electrolytic Capacitor | 5 | $9.67 | 1 | $1.93 | Amazon |
| DPDT Rocker Toggle Switch | 5 | $12.89 | 2 | $5.16 | Amazon |
| Universal Power Cord | 1 | $3.49 | 1 | $3.49 | Amazon |
| Fuse 10 amp (though 5 amp is enough) | 20 | $4.60 | 1 | $0.23 | Amazon |
| Reel - HDX 150 ft. 16/3 Cord Storage Reel | 1 | $7.97 | 4 | $31.88 | Home Depot |
| 1/2” Lightning Rod | 8 | $10.39 | 4 | $5.20 | Home Depot |
| 14 Gauge Stranded THHN Wire/ reel-HDX 150 ft.16/3 cord storage | 500 | $33.17 | 1000 | $66.34 | Home Depot |
| Total | $214.53 |
As designed, the system supports an electrode distance \(\alpha\) of 250 ft (~75 m). Each spool of wire was cut into two sections of 375 ft and 125 ft, making four total segments. Electrical clips (one large and one small) were then soldered to the ends of each wire segment. When siting, the large clips are connected to the electrodes, and the small ones to the switching box. To create the electrodes, the 8 ft grounding rod was cut into four segments (of at least 1 ft in length) using a hacksaw, then sharpened at one end to make them easier to drive into the ground.
The switch box circuitry was designed to fit the rectifier, capacitor, and switches inside the Hammond enclosure, in order to keep the high-voltage electronics isolated and reduce the risk of shock. The wiring is shown in the image below:
Testing and lessons learned
Early testing of the v1 device appeared promising: our first outing, in a river-side park in Morton Grove, IL, resulted in the following chart, showing a clear change in resistivity at an \(\alpha\) of about 20m:
Overall, though, the v1 meter testing was marked by more technical setbacks than successes. Some of the biggest problems observed in the field by our partners were the following:
Harbor Freight meters
The inexpensive Harbor Freight meters would consistently break when used as the current sensor, spoiling the data from several test runs, and requiring the purchase of a costlier meter for each setup. The Harbor Freight design (seemingly reused in all cheap multi-meters) also has an issue with decimal point placement when switching between (the already confusingly labeled) measurement modes. Just avoid this meter and anything that looks like it.
Unreliable connection
Although the switch box was originally designed to use banana jack connectors/posts, I was never able to locate an inexpensive male banana connector to attach to the end of each wire. Using the small clips from the Harbor Freight package worked well enough, but the movement of the relatively stiff wire occasionally shifted a clip and caused an electrical short (potentially responsible for some of our multi-meter issues).
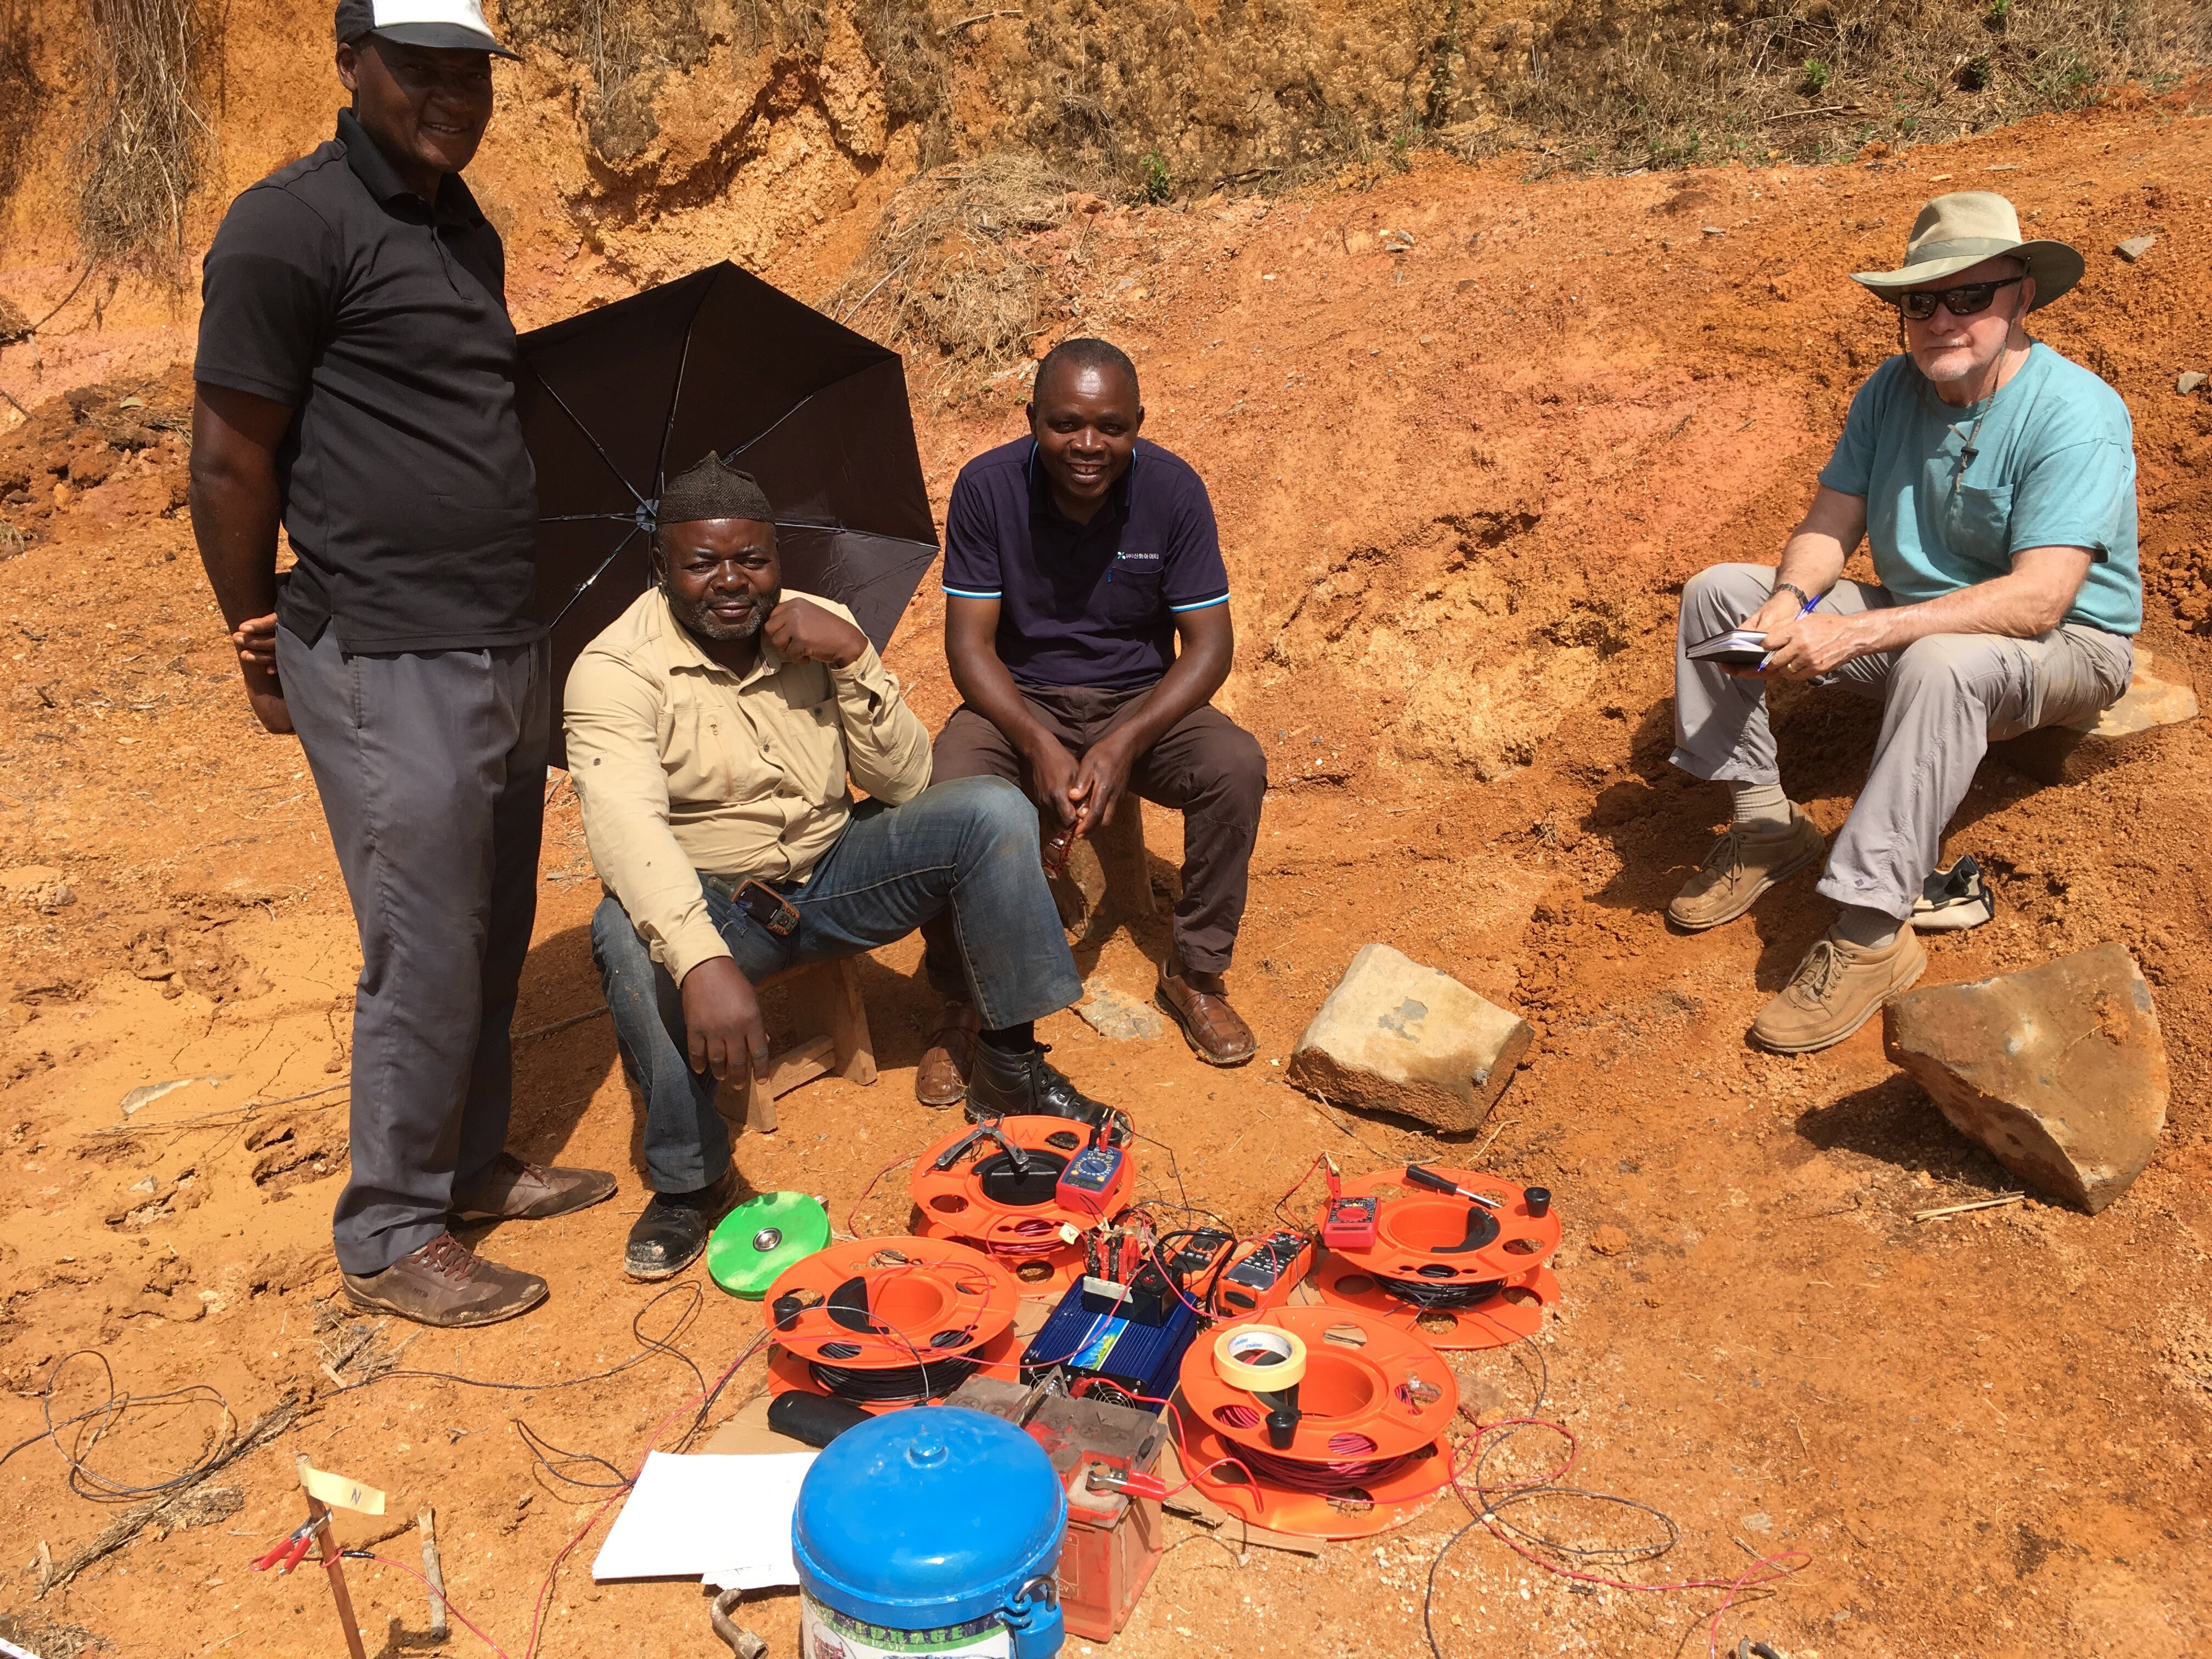
After some experience with the equipment, this issue seems to have resolved itself, though our partner Eugene in Cameroon came up with his own connector solution:
Confusing results
The most problematic aspect of the v1 testing process has been the inconsistent and occasionally confusing results. While this can be partially attributed to the Harbor Freight meters and potential connectivity problems, other test results have sharply diverged from baseline measurements (either in the form of previous borehole logs, or direct comparisons with COTS siting meters) without any obvious malfunctions.
Still, a most recent field test against a Sting R1 meter yielded promising results:
Version 2
Clark acknowledges some of the problems with the v1 design in his original paper, citing them as the motivation for developing an improved design:
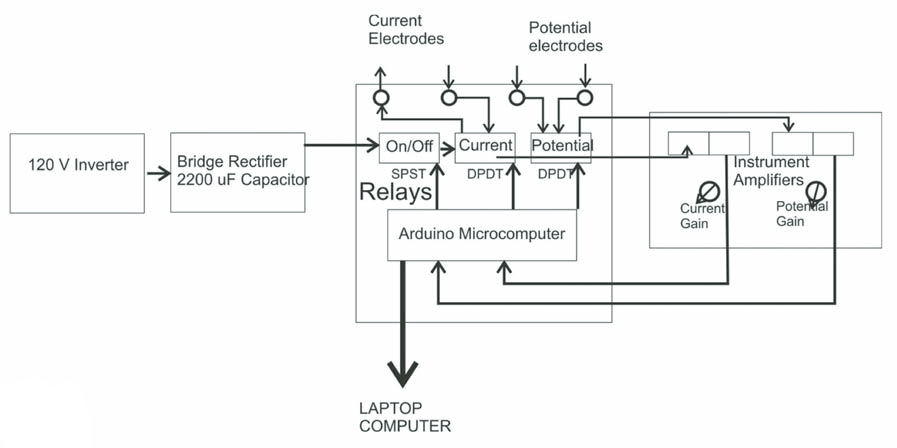
To overcome the limitations of our earlier resistivity instrument, our newer device includes an Arduino microcomputer that measures the current and the electrical potential and controls three relays that replace the manual reversing switches… An advantage of this instrument is that 50 or more measurements can occur at each current direction, readings are taken at precisely the same times, and many reversals of current can occur. Averaging of the multiple samples greatly improves the signal-to-noise ratio, and a laptop, connected to the Arduino, processes the values obtained by the Arduino microcomputer.
A schematic of the “improved” device, showing the Arduino-powered automatic switching circuitry, and amplified current and voltage readings, was also included in the paper:
When I emailed Dr. Clark to ask for details on his new design, however, he explained that the current iteration of the “improved” device was unstable, and that they had so far been unable to trace down the root cause (as of May 2017). Given the tight schedule for our development, we decided the best option was to proceed with our own automated version (v2), based on Clark’s “improved” design.
In addition to the on-board Arduino Pro Min (to control the DPDT relays), and instrument amplifiers (for voltage/current measurement), the v2 design also includes a DC-DC boost convert, capable of taking the 12V battery input up to 75-150V, and a 16x2 LCD display with two buttons, for the user interface.
Here’s a look at the first assembled v2 meter in action:
Check out the full project on Github, the BOM on Octopart, and the board at Oshpark.
Future work
We’ll be presenting the v2 design at the upcoming EWRI World Engineering and Water Resources Congress 2018 in Minneapolis, and plan on some initial field testing in the weeks leading up to the conference.
Initial bench top test results indicate that the (rev A) on-board boost converter is slightly underpowered, and high-power measurements might cause the voltage level to dip, which will be addressed in an upcoming design change if it causes any issues. Once testing is complete, we plan on sending the first batch of v2 meters to our partners worldwide.
Pictured from left to right: Eric, the well owner; Eugene, program manager and geologist; Lazarus, geologist, and Chuck, geologist, test the prototype of the resistivity meter in Njavnyuy, Cameroon.
